Scripting allows more control over certain actions and reactions in game - e.g. Walk speed. Scripting walk speed manually can help when working with a differently scaled asset created in an outside piece of software like Maya.
- When playing the AngryBots/Stealth Unity demo think of what the game designer is making happen.
- Player movement, aiming, shooting.
- Damage applied to enemy from being hit, reducing health, eventually the enemy dies making the asset inactive.
Unity controls work on the X ad Z axis.
- If you want a level to appear skewed or diagonal in view from the camera, create the level on the X/Z Axis then use the main camera to make the level appear diagonal.
- If you don't create the game on the X/Z Axis but apply the main camera to the X/Z Axis it will mean the player controller won't be able to move in straight lines and it will require zig-zag waking in order to move forward/back/up/down.
Unity uses Javascript and C#.
- They can work together.
 |
| Player Health Script |
From the 'Stealth' demo for Unity, there are short tutorial chapters on the Unity Asset store that give a walkthrough about how some of the things were achieved in the demo.
In Unity, there's a Centre or Local/Global pivot point for Asset controls, this is helpful in translating/rotating/scaling GameObjects.
 |
| Centre or Local/Global in Top Left Corner |
- You can then find it through Standard Assets in the Project Window.


 |
| SmoothFollow Script |
The problem with this script is it won't allow the player controller to follow where the Mouse is aiming. We can fix this in MonoDevelop with the PlayerMovement Script.
- Public Class = Always the same as the Script name, lower case sensitive.
- If you delete a curled bracket you need to delete its partner to. If yo click on a curled bracket it should highlight its partner for you to see.
- Integers are solid numbers (1,2,3,4). Floats can be decimals (0.3, 1.7, 4.2)
- Bool = True/False
- '//' = Comment in Scripting, will not interfere with coding.
- == is 'equals to'.
- = is 'equals'.
- Script-line 'Statements' need to end with a ; symbol.
- Public/Private script-line = Public can be edited within game and seen. Private = Editable only in script.
- Vector3 = Gives you co-ordinates of a space. (e.g. 2, 30, 16)
- If you want to Animate something you need to reference the Animation. e.g. Animator anim;
- In the language of C there, Script-Lines tend to start the first word with lower-case then proceed with capital words with no spaces. e.g. Rigidbody playerRigidBody;
- Void = Same as 'Function' in Javascript.
- Awake = When the game launches it runs this Script-Line.
- When you reference GetComponent in a script-line, the component you want selected should be in < >'s.
- In Scripting, Variables are lower-case, Functions are capitals.
- 'FixedUpdate' (Update) runs every frame in the game. Fixed Update comes after Update. FixedUpdate is usually applied for Game Physics.
- float h = Input.GetAxisRaw ("Horizontal") - h = Horizontal.
- A 'void' command will never run itself however it is a command that can be accessed when told to.
movement.Set (h, 0f, v);
// Normalise the movement vector and make it proportional to the speed per second.
movement = movement.normalized * speed * Time.deltaTime;
- If you apply the SmoothFollow script to the Main Camera nothing will happen at first, however if you drag whatever it is you want the Camera to follow into the box reading: None (Transform) the script should work properly.

In the image above you can see the script-line says 'h' and 'v' values are influenced by the Move, Turning and Animating 'void' commands beneath.
- In order to make Movement more dynamic for the player controller, you can change movement speed by using universal values. Like below:
// Set the movement vector based on the axis input.
movement.Set (h, 0f, v);
// Normalise the movement vector and make it proportional to the speed per second.
movement = movement.normalized * speed * Time.deltaTime;
movement = movement.normalized * speed * Time.deltaTime;
- Next on camera turning, the below script-line translates to. Where out camera faces, a ray is cast, this ray is affected by the players Mouse Position on screen.
// Create a ray from the mouse cursor on screen in the direction of the camera.
Ray camRay = Camera.main.ScreenPointToRay (Input.mousePosition); Debug.DrawRay (camRay.origin, camRay.direction *1000, Color.red);
- It then says, If the Mouse Position collides with the Floor layer mask, the ray of the camera view will be affected.
// Perform the raycast and if it hits something on the floor layer...
if(Physics.Raycast (camRay, out floorHit, camRayLength, floorMask))
if(Physics.Raycast (camRay, out floorHit, camRayLength, floorMask))
The whole 'void Turning' script is:

Trying to animate a floor panel to fall away from the floor when walked over.
- Add a Box Collider, adjust centre pivot via X,Y, Z values.
- Colliders = Components > Physics > Box Collider.

- We then add a 2nd Box Collider, switch to 'Trigger'. This will mean when the Player Controller passes through this collider it will trigger what we tell it to.

After the Colliders are applied to the Asset, we want to give it an animation to trigger when the player touches the Trigger Collider.
- To do this we go to the animation window, create a new clip, assign it to an appropriate save place and begin to animate on the time-line.
- I've given the floor tile a slight wobble animation followed by it falling away from the floor.
- The result should be, Player Walks > Player Collides the Trigger > Floor Box Collider triggers Animation > Animation completes.


 |
| Finished Animation Timeline |
- Next we need to go to Component > Miscellaneous > Animator - and apply this to the Floor Tile.
- Then we need to go to Project > Create > Animator Controller.


- You then drag the Animator Controller onto the Controller line of the Animator applied to Floor Tile. ( shown in the above Left Image)
-------
- If you're going to Animate in Unity, create a parent for the Asset and then animate everything underneath it (In the Hierarchy).
- With the Floor Tile selected, go to the Animator window and in the bottom left corner, create a new 'bool' parameter. (Named: platformFalling) - Variable, lower-case again.

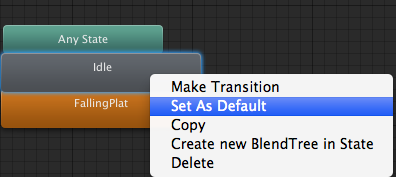
- Create a new 'State' in the Animator window. We can put this in the middle of 'Any' and 'FallingPlat' and rename it to 'Idle'.
- We then need to right Click the 'Idle' state and set it as default so it won't automatically play the Falling Platform animation when the game starts.

- Change the 'Conditions' to the script you've created for the trigger event and set as 'true'.


- After applying the 'Destroy' script to the Floor Tile, go to the Animator window and 'Add Event' at the end of the animation timeline for the asset.
- After clicking to add a new event it should ask you what Function you want to apply to the event on the timeline. From here select the 'Destroy' script that has been attached to your Floor Tile asset.
- Playing the game should now mean when the Floor Tile falling animation is triggered, it will be destroyed after completing the animation.

 |
| The Floor Tile has fallen and been Destroyed. No collider for the Player to interact with left. |
No comments:
Post a Comment