Saturday, February 28, 2015

EP: Research - Elder Scrolls Online

Having recently played around a bit with Elder Scrolls Online, I spotted some great atmospheric environments in the game that I found to come out of nowhere. While I don't think they necessarily fit in with what I've seen from past expansions of the Elder Scrolls series, I do really like some of the lighting Bethesda have used in areas.

Places like the starting prison and the realm in The Harborage quest are set in other realms/plains of existence and I think this reflected very well by the dark, moody and surreal-like coloured environments. The idea of having a very civilized structure or series of constructions planted in a strange location, abandoned and barren; really appeals to me. It continues on from the themes in Dark Souls 1 & 2 which have inspired me. I'm reminded again by Elder Scrolls Online to think of location and setting, possibly attempt tie in why the game is taking place in said strange land and how the player got there.

My 'Elder Scrolls Online' Inspiration Board

In regards to the lighting - I particularly like the darker areas in 'ESO', I think the use of contrasting light temperatures is great and Bethesda aren't afraid to inject some vibrant colours into environments to convey a sense of wonder & mystery. The Harborage area has a mixture of horror, surreal fantasy with Victorian, classical architecture, it reminds me of H.P. Lovecraft. I really like the difference in design - very formally structured buildings mixed in with a primal, natural and chaotic setting. it's unsettling and may create some discord for the player - really interesting concept that I may want to look more into.

EP: Research - Dark Souls 2

Dark Souls 2 is also inspiring to me. While I think Dark Souls has much more character and personality in its environments, I do think Dark Souls 2 has a great sense of scale and use of location for architecture. Castle and towers on high mountains, cathedrals and ruins on open seas. It also benefits from having more up-to-date visuals which help the appearance of the vistas in the game.

A primary source of ideas for me has been the area: Heide's Tower of Flame. It has a very regal, classical architecture inspired style to the whole place with parts them look reminiscent of Ancient Greek buildings. Also, something I really like about the area is its lighting. Anor Londo in Dark Souls looked like a masterpiece however the orange light of the place which bled into every bit of its area sometimes appeared too monochromatic to me. I understand why it was like this, orange  and bright to look celestial as it was the city of the Gods but I just prefer the area of Heide's Tower of Flame in Dark Souls 2. It's brighter, there are nice breaks between colours: Deep blue sea and sky, orange horizon and white and cerulean tiled buildings.

My 'Dark Souls 2' Inspiration Board

A key thing I like about Heide's Tower of Flame is that it's in such a weird, surreal location. There's a huge cathedral, a dome-shaped building and a big tower with intricate pathways and detailed bridges all in the middle of the sea next to a huge mountain range. Why not build on the land? Why the sea? The tower looks quite lighthouse-like I suppose but still, there's no ruins or civilization on land. It's weird and unlikely but I think it looks great and adds to the sense of being in a far-off enigmatic land.

EP: Research - Dark Souls

To begin with Environmental research, I'm looking to the Dark Fantasy genre, as Dark Souls was the initial inspiration that sparked this whole idea I thought I'd start off with it first.

Dark Souls has a lot of 'realistic' architecture. Believable structures that don't seem too fantastical but have that added style which you don't often see. Interestingly, it's quite common knowledge that Hidetaka Miyazaki (From Software), the lead designer of Dark Souls, took a lot of inspiration from real world architecture. One of the most notable areas in-game that was real world inspired is Anor Londo. Anor Londo, mainly its interior with its marble spiral staircase, is based on the Milan Cathedral. This has reminded me I need to look at real world architecture too as I could find some great ideas from other places besides digital artifacts.

My 'Dark Souls' Inspiration Board

I recognize that taking on the responsibility of creating an entire game myself is a lot work, therefore I want to limit the scale of the level and plan out accordingly how the space will be used. I found the starting place of Dark Souls one to be the perfect example of what I want as a final piece.

The Northern Asylum, a disguised tutorial island, in Dark Souls is a small area that includes an underground prison and a chapel built on the side of a cliff-face. The small space is used very efficiently as not only does the player travel horizontally, but the level snakes around on itself vertically to flesh out the area more - it makes the environment more real, believable and understood by the player. Luckily I've managed to find a floor plan of the level with a legend that makes it very understandable from a design perspective. Also, I came  across a map of Lordran which is the larger mainland of the game, I want to include this in my research as this also shows efficient use of space in level design.

Asylum Floor Plan

Lordran Map

EP: Statement of Intent

This is the Statement of Intent for my Extended Practice module. 

In short; I want to create a Game with a Dark Fantasy aesthetic. I want to support it with its own original lore and it should appeal to gamers who enjoy the RPG, Fantasy and Puzzle genres. With the project I'm really hoping to push my skills in new pieces of software I've not touched before and produce things I haven't tried too. This may include: intermediate coding, GUI design and implementation and combat mechanics. These aren't priority but I am still researching into them.


Tuesday, January 27, 2015

PPP3 - ZBrush Skills #2

Cont.

Sculpting & Painting

Left Click + Shift = Smooth Brush
Left click + Alt = Opposite of selected 'zAdd' or 'zSub'
'x' in Edit Mode = Activate Symmetry. (to change which Axis the Symmetry is applied to: Transform > Activate Symmetry > X/Y/Z/Radial)

To paint a polymesh surface, it needs its colour 'Filled'.
Color> FillObject = Base Colour will be Uneditable outside of FillObject.
This allows you to apply Colour to a Polymesh surface with a brush once you deactivate zAdd & zSub.
You can also Paint with zAdd/zSub, the colour will be applied along side the changes made to the Mesh.


Painted Surface ft. Masks: zAdd, zSub, RGB

Masking

'Ctrl' in Edit Mode = +Mask
Ctrl + Alt = -Mask
Left Click + Ctrl + Drag in Canvas area = Box Masking
Left Click + Ctrl + Alt + Drag in Canvas area = Box Unmasking
One of the above 2 Commands + Space Bar = Move Box Selection

Tool >  Masking > View Mask = Changes Visibility of all Masks
Tool >  Masking > Inverse = Inverts mask Selection
Alternatively:
While holding Ctrl, Left Click on Canvas Area = Inverts Mask Selection
Holding Ctrl brings up a Mask Brush menu to manually mask in different ways.

With Primitives, you can Mask By Alpha which offers deeper control on mesh masking.
it's possible to mask a certain amount of rows/columns or even  a grid mask.

Also, if you're using the 'Move' tool and you hold Ctrl you can use Topological Masking.
This allows you to choose parts of a Mesh that you want to Transpose.

Move Tool + Masking

Deforming Geometry

Tool >  Deformation = Allows Mesh Deforming
If you combine Masking with Deformation you can mold a basic shape very quickly into something that may be more useful to sculpt.


Gravity, Taper, Inflate + Inverted Masking

Polygroups

Must have PolyF (Poly Frame) turned On.
Ctrl + Shift + Left Click Drag = Rectangular Group Selection (Green)
Green = Visible
Red = Invisible
Ctrl + Shift + Click in Canvas Area = Inverts Visibility
Alt + Ctrl + Shift + Left Click Drag = Rectangular Group Selection (Red)
On the Ctrl + Shift Brush Menu you can also Select 'Slice Curve' which will make seperate Polygroups instantly from its selections.

Tool >  Geometry > Modify Topology > Delete Hidden (Will delete all Polygons that are not Visible)
Tool >  Polygroups
This Menu allows you to Edit/Create Polygroups in a Number of Ways.
Ctrl + W = Create Polygroup from Selected.
Ctrl + Shift + Click on Polygroup = Makes Group Selected the only Visible Polygroup.
You can also create Polygroups from Masks.
'Polish' slider allows Crisper selected Polygroups.

You can use the 'Move' Tool on seperate polygroups.
Click on the Mini Red Circle (in PolyF) of a Polygroup to align the Move Tool to the Group.
Ctrl + Left click with 'Move' Selected to Mask off other Polygroups.

Tool > Subtool > Split > Split Hidden (Split Hidden Polygroup/Polygons)
Tool > Geometry > Edge Loop
Crisp > Create Edge Loop = Creates a new Polygroup on sides of Selected

Polygrouped Pupil of Eye after being Transposed

Materials

Apply by:
Painting with 'M' channel on, zAdd/zSub off
Select Material, Color > FillObject

Open Materials Shelf  > Different Materials present different Modifiers
You can save Modified/Created Materials and load them in future.


Primitive + Chrome with Cavity Detection and Base RGB


Zplugin > Subtool Master > Fill > Color/Material/Color+Material
If you click Ok with non selected, it will revert your Geometry's Material back to the Default state.

Textures

Texture Tile (left shelf) > Select Material = Allows Painting with Texture
Tool > Texture Map > Open Texture = Applies Texture to entire Geometry
Tool > Polypaint > Create Polypaint from Texture = Creates a new Polypaint from loaded Texture Map
Tool > Texture Map > Create > New from Polypaint = Creates Texture Map from Polypaint on Geometry (Requires UV Map)

To create a simple UV Map in ZBrush:
Subdivide Geometry
Apply Texture/Polypaint
Lower Subdivision
Tool > UV Map
Select UV Size (512 - 4096)
PUVTiles ( Pack UV Tiles, Can user UV Master Plugin for better results)

Saturday, January 24, 2015

PPP3 - ZBrush Skills #1


2.5D "Drawing" using Pixols.

1. Alpha + MRGB + zAdd = Edits Material, Colour and Positive Depth of Alpha Brush.
2. Alpha + RGB = Edits Edits Colour of Material applied to Alpha Brush.
3. Alpha + M = Edits Material applied to Alpha Brush.
4. Alpha = Alpha Brush.
5. Select Alpha Brush.
6. Select Material.

4 Different Version of Alpha

File Types

Document > Save As = .zbr File. (Used for 2.5D Based Files. e.g. Illustrations with Depth).
File > Save As = .zpr File. (Used for 3D Primarily) Includes loaded Subtools & Materials.
Tool > Save As = .ztl File. (Used to Save/Load zTools).
Tool > Import = Use .obj Files to import Meshes from other programmes. (e.g. Exported .obj file from Maya)

Display

Draw > Perspective/Floor = Change Angle of View & Grid Size
Transform > PolyF = Show Mesh (Highlighted Meshes are different Polygroups)
Transform > Transparent > Ghost = Changes non-selected Polygroups to Transparent or Ghost Transparency.
Transform > XPose = Seperates all Polygroups from each other in displays them as individual Meshes
See-Through Slider = Changes Transparency of zBrush, can be used for reference images.
Draw > Front-Back > One > Map1/2 = Adding Texture Plane (Reference Planes/Boxes)

Texture Maps Applied


Draw > Fill Mode = Changes Transparency and Depth of Texture Plane (Off, Background 50%, Background 100%, In-front of Mesh)

Transforming Objects

With Primitives you can edit their Meshes in the Tool > Initialize menu and modify the geometry of a shape before converting to a Polymesh.

W = Move - Opens up the 'Transpose' Brush (1st + 3rd Circle dragged from one end to other, use 2nd Circle to Move Mesh)
E = Scale
R = Rotate

Pre-Initialized 'Gear' Primitive and then Transposed

Tool > Geometry > Position = Alternative way of moving Object within Canvas space (Remembers default Coordinates)
Tool > Geometry > Size = Works the same way as the 'Position' subtool.

Subdivisions

1. 'Divide' Button used to Subdivide geometry only when already converted to a Polymesh.
2. Resolution Slider. Switch between levels of Lower/Higher Subdivisions.
3. Example of zAdd on Object.
4. zAdd applied to Object at Lvl 3 Subdivision.
5. Higher Resolution zAdd on geometry.
6. Shows a higher lvl of Subdivision, meaning any zAdd changes to geometry are of a higher poly count. Note: zAdd geometry applied at lower Subdivision levels stays a similar quality.
7. Changed back down to a lower resolution.
8. zAdd geometry still apparent but the smaller amount of polys has affected the quality.


Wednesday, December 10, 2014

PPP3 - Alien: From Film to Game

I attended a lecture about the the newly released Video Game title, Alien: Isolation by Creative Assembly and how the source material has been transformed from 'Film to Game'.

The panel included:

Alistair Hope - Creative Lead (Started from Fine Art)
@wannaneeda

Dion Lay - Writer (Art background, started as Game tester for Creative Assembly)
@cannibalgymnast

Will Porter - Writer (Previously a games Journalist for PC Zone)
@batsphinx

Jamie Sefton - Managing Director (Games Republic)
@jeffers007


Early Stages of Ideas, Design and Research

- Alien: Isolation started as a tech demo. After a lot of positive feedback it was turned into a larger project and then eventually was decided to be developed into a fully fledged Video Game.

- It was decided to go with a monochromatic environment to give a sense of being in the films world.
. Wanted to seem less digital, less cold

- Concept Artists were given analog medium constraints. (e.g. Pen & Marker)
. This was because the original concept artists and designers in the 1979 Alien film had to work with these mediums.
. The hopes of doing this were that they would capture that same feeling of time/style in the original.

- The FOX broadcasting Company supplied Creative Assembly with 3TB worth of cataloged 'stuff' involved in the creation of the 1979 Alien film for them to use as research.
. Original concepts, unused sound recordings & scrapped ideas were included.

- By following the original source material closely and working in the same way the original makers of the 1979 Alien film did, Creative Assembly hoped to capture the same aesthetic and essence that made the original film so great.
. They wanted achieve the 'low-fi sci-fi' trademark style.

- With the need for content to build the concept into a fleshed-out game, there was a need to invent new stuff. However, this 'new stuff' needed to still feel like Alien.
. This proved difficult but do-able due to our future being very different from the imagined future in the 70's,
. This meant all sources of inspiration had to be restricted to nothing later than 1979.
. This was seen as both 'freeing' and 'restricting' at the same time.


Game Objectives, Creating the Alien and the Players Psyche.

- The Alien's AI was purposefully created to listen/look and seek out the Player.
. This means every encounter with the Alien is different. 
. This also means every play-through of the game is different offering the potential of replay-ability and unpredictability. With this in mind, Creative Assembly hope that this will keep the Alien scary.

- Creative Assembly also decided to never name the Alien in the game. The Alien has been referred to as 'it' (e.g. "It's coming, I can hear it close by") instead of using terms like 'monster', 'creature' or 'alien'.
. The aim of this was to keep the Alien detached from identity and feel much more...well, alien.

- In terms of Animation, the Alien was purposefully made to move slowly when searching or the player in rooms and corridors. It even unfurls itself very slowly and dramatically after dropping down from a vent. 
. This shows power, no fear for surrounding people and its environment because it is the dominant life-form. It doesn't need to run, it stalks its prey.

- When it comes to the Sound aspect of the game, Creative Assembly had ideas to intensify encounters with the Alien. An example of this is, say the player hides in a locker because the Alien has just dropped down into the room and is seeking them. If the Alien comes close to the locker where the player is you will hear the environment/ambient sound "duck" down meaning the background noise will reduce as the foreground noise (in this case the Aliens breath and movements along with the players breath) feel much louder, more intense and more detailed to the players ears.
. This artificially pushes the player & the Alien closer and makes the happening incident feel a lot more intimate and claustrophobic. 

- Speaking of hiding in lockers, Creative Assembly wanted to give more realistic (which may appear as 'not many') hiding places in Alien: isolation than other games tend to.
. Places like lockers or literally hiding under a desk or medical table may present themselves as the only protection in some situations. 
. The hopes for having hiding places were that they would appeal to the players instinct to run/hide from danger and seek out safety constantly. They did not want Alien: Isolation to be about guns.

- At its core, the game objectives of Alien: Isolation are very simple. However the players self-doubt and constant weighing up if it's worth it making noise which might attract the Alien flesh out the game.
. Creates atmosphere & psychological involvement.
. Makes simple objectives & space between plot progression feel full and immersive.

- The original cast from the 1979 Alien film were also included in the development of Alien: Isolation at the request of Creative Assembly.
. In fact, it was Sigourney Weaver herself who mentioned referring to the Alien as 'creature' makes it seem much more friendly/cutesy to her and suggested something more detached like 'organism' or just simply 'it' made the Alien sound much more scary.

Tuesday, November 18, 2014

PPP3 - Unity Workshop #2


- Now we want to animate a door to open and close when triggered.
- In order to do this we need an OnTriggerExit script line added to our previous script with some modifications.

- When our Door opens it will move the collider and we don't want this.
- In order to get around this we need to make an 'Empty' object, parent our Door to it, delete the Doors own Box Collider and animate the Door without a collider.
- After this we need to create an animation for the door opening and an animation for the door closing.
- Once again we then need to go into the 'Animator' window where e should have 'OpeningDoor' and 'ClosingDoor' states.
- Here we create an 'Idle' state again and change it to the default state. Link the transition from this Idle to 'Open' state and mark conditions as if: True.
- We then create 2 Transitions again to the Opening and Closing states and change their conditions to match with the bools in our Door script which are: openDoor and closeDoor.


- Next we're making a Light that will turn on when the Player enters a trigger collider through the door.

Enables Light when entering Trigger Collider
- We tried to get a Light Switch working but for some reason it wasn't working. The WIP code is below though:


- On the bright side it includes 'GetKeyDown' commands, and I learnt from it how to create a Debug Log to check actions of the script.

! = 'Not. e.g. 'lightOn = !lightOn;'

EDIT: Updated Light Power script working as intended.
When In Range > Able to Press Button > Turn Light On.
When Out of Range > Button Press has No Effect.


- Random Generated Rooms = Look at 'Arrays'.


PPP3 - Unity Workshop #1


Scripting allows more control over certain actions and reactions in game - e.g. Walk speed. Scripting walk speed manually can help when working with a differently scaled asset created in an outside piece of software like Maya.

- When playing the AngryBots/Stealth Unity demo think of what the game designer is making happen.

 - Player movement, aiming, shooting.
- Damage applied to enemy from being hit, reducing health, eventually the enemy dies making the asset inactive.

Unity controls work on the X ad Z axis.
- If you want a level to appear skewed or diagonal in view from the camera, create the level on the X/Z Axis then use the main camera to make the level appear diagonal.

- If you don't create the game on the X/Z Axis but apply the main camera to the X/Z Axis it will mean the player controller won't be able to move in straight lines and it will require zig-zag waking in order to move forward/back/up/down.

Unity uses Javascript and C#.
- They can work together.

Player Health Script

From the 'Stealth' demo for Unity, there are short tutorial chapters on the Unity Asset store that give a walkthrough about how some of the things were achieved in the demo.

In Unity, there's a Centre or Local/Global pivot point for Asset controls, this is helpful in translating/rotating/scaling GameObjects.


Centre or Local/Global in Top Left Corner
- You can get a default Camera Follow Player script from importing packages.
- You can then find it through Standard Assets in the Project Window. 


SmoothFollow Script

The problem with this script is it won't allow the player controller to follow where the Mouse is aiming.  We can fix this in MonoDevelop with the PlayerMovement Script.
- Public Class = Always the same as the Script name, lower case sensitive.
- If you delete a curled bracket you need to delete its partner to. If yo click on a curled bracket it should highlight its partner for you to see.
Integers are solid numbers (1,2,3,4). Floats can be decimals (0.3, 1.7, 4.2)
- Bool = True/False
'//' = Comment in Scripting, will not interfere with coding.
- == is 'equals to'.
- = is 'equals'.
- Script-line 'Statements' need to end with a ; symbol.

- Public/Private script-line = Public can be edited within game and seen. Private = Editable only in script.
- Vector3 = Gives you co-ordinates of a space. (e.g. 2, 30, 16)
- If you want to Animate something you need to reference the Animation. e.g. Animator anim;
- In the language of C there, Script-Lines tend to start the first word with lower-case then proceed with capital words with no spaces. e.g. Rigidbody playerRigidBody;
- Void = Same as 'Function' in Javascript.
- Awake = When the game launches it runs this Script-Line.
- When you reference GetComponent in a script-line, the component you want selected should be in < >'s.
- In Scripting, Variables are lower-case, Functions are capitals.
- 'FixedUpdate' (Update) runs every frame in the game. Fixed Update comes after Update. FixedUpdate is usually applied for Game Physics.
- float h = Input.GetAxisRaw ("Horizontal") - h = Horizontal. 
- A 'void' command will never run itself however it is a command that can be accessed when told to.
            movement.Set (h, 0f, v);
            
            // Normalise the movement vector and make it proportional to the speed per second.
            movement = movement.normalized * speed * Time.deltaTime;

- If you apply the SmoothFollow script to the Main Camera nothing will happen at first, however if you drag whatever it is you want the Camera to follow into the box reading: None (Transform) the script should work properly.


In the image above you can see the script-line says 'h' and 'v' values are influenced by the Move, Turning and Animating 'void' commands beneath.

- In order to make Movement more dynamic for the player controller, you can change movement speed by using universal values. Like below:

 // Set the movement vector based on the axis input.
            movement.Set (h, 0f, v);
            
// Normalise the movement vector and make it proportional to the speed per second.
            movement = movement.normalized * speed * Time.deltaTime;

- Next on camera turning, the below script-line translates to. Where out camera faces, a ray is cast, this ray is affected by the players Mouse Position on screen.

// Create a ray from the mouse cursor on screen in the direction of the camera.
            Ray camRay = Camera.main.ScreenPointToRay (Input.mousePosition);            Debug.DrawRay (camRay.origin, camRay.direction *1000, Color.red);


- It then says, If the Mouse Position collides with the Floor layer mask, the ray of the camera view will be affected.

   // Perform the raycast and if it hits something on the floor layer...
            if(Physics.Raycast (camRay, out floorHit, camRayLength, floorMask))

The whole 'void Turning' script is:


Trying to animate a floor panel to fall away from the floor when walked over.
- Add a Box Collider, adjust centre pivot via X,Y, Z values. 
- Colliders = Components > Physics > Box Collider.


- We then add a 2nd Box Collider, switch to 'Trigger'. This will mean when the Player Controller passes through this collider it will trigger what we tell it to.


After the Colliders are applied to the Asset, we want to give it an animation to trigger when the player touches the Trigger Collider.
- To do this we go to the animation window, create a new clip, assign it to an appropriate save place and begin to animate on the time-line.
- I've given the floor tile a slight wobble animation followed by it falling away from the floor.
- The result should be, Player Walks > Player Collides the Trigger > Floor Box Collider triggers Animation > Animation completes.


Finished Animation Timeline

- Next we need to go to Component > Miscellaneous > Animator - and apply this to the Floor Tile.
- Then we need to go to Project > Create > Animator Controller.


- You then drag the Animator Controller onto the Controller line of the Animator applied to Floor Tile. ( shown in the above Left Image)

-------

- If you're going to Animate in Unity, create a parent for the Asset and then animate everything underneath it (In the Hierarchy).


- With the Floor Tile selected, go to the Animator window and in the bottom left corner, create a new 'bool' parameter. (Named: platformFalling) - Variable, lower-case again.


- Create a new 'State' in the Animator window. We can put this in the middle of 'Any' and 'FallingPlat' and rename it to 'Idle'.
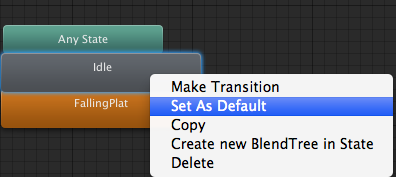
- We then need to right Click the 'Idle' state and set it as default so it won't automatically play the Falling Platform animation when the game starts.


- If you then Right-Click the 'Idle' State and Make Transition, link it to the 'Falling Plat' state, you should have a link between states.
- If you click on this link, you can see a 'Conditions' box on the far right.
- Change the 'Conditions' to the script you've created for the trigger event and set as 'true'.


- After applying the 'Destroy' script to the Floor Tile, go to the Animator window and 'Add Event' at the end of the animation timeline for the asset.
- After clicking to add a new event it should ask you what Function you want to apply to the event on the timeline. From here select the 'Destroy' script that has been attached to your Floor Tile asset.
- Playing the game should now mean when the Floor Tile falling animation is triggered, it will be destroyed after completing the animation.


The Floor Tile has fallen and been Destroyed. No collider for the Player to interact with left.

Thursday, November 13, 2014

PPP3 - After Effects & Motion Comics


3D Layers & Camera Setup

To avoid sending too much data over the network at University, create a local Cache folder for your work within After Effects.

After Effects > Preferences > Media & Disk Caches

Change the location to the scratch disk, make AE its own Cache folder and reduce max size to 50GB.


Import Animation Ready File, change format to Composition. Keep it editable, do NOT merge.


Reduce the Composition resolution down to 1920x1080 in Composition > Composition Settings

- Change all layers in composition into 3D layers.


- Set up  views in your Project Window (Front + Top). Similar to Orthographic view in Maya.
- Transform the Z position of each layer to give the effect of separate 3D layers. (Parallax)


Now make a Camera to view the 3D Layers through.

Layer > New > Camera

- Enable Depth of Field so you can adjust focus and aperture of the camera in the composition to convey depth better.
- If you enable global Motion Blur this will also help too.

Camera Options

After you've set up the parallax, depth of field on the camera and its position you can animate the camera to appear like you're flying through the scenery.
2-View look of Camera's POV

Puppet Tool

- Using the 'Space Scene' PSD file provided, create a new project.
- Select the Claw layer.
- Select the 'Pin' tool, ticking the Mesh box next to it.


Once the Pin is placed on the Claw layer, an elastic Mesh should appear on the layer

After putting a few pins in the Ship and Astronauts legs and arms, I got something ridiculous like this:


The Ships legs in particular are a little to bendy and look too organic.
- A way to fix this is starching a puppet.
- Hold Left-Click on the Pin Tool to bring up the Starch tool selection.


After this, reset the Legs positions under the Composition Layer Effects menu.
- Apply starch to the Top and Bottom joints of the Leg meshes.

One last thing with Puppet-making in AE is overlapping.

- Holding Left-Click on the Pin Tool again will bring up the Overlapping Tool for you to select.
- Apply a dot onto the place you want to overlap (The Astronauts Hand for example)
- Apply the extent to which you want this dot to effect the mesh. (The entire arm of the Astronaut)
- Then reduce the 'in Front' percentage in order to give the value of what distance you want the Astronauts hand to have in terms of depth.


I really like the effect you can get with the effect of parallax and depth perception in After Effects. A great example of seeing it in the cinematic world is the trailer for Guild Wars 2 created in 2009. The entire trailer is compiled from various pieces of concept art for the game forged into a narrated 2D story with movement.